# Chatbots
SPooN's solution can be connected to different chatbots.
# Dialogflow
Spoon solution can be connected to chatbots (or agents) created in DialogFlow ES.
In order to create a new chatbot, you can follow the tutorial proposed by Google (opens new window)
# How to link a Spoon release with DialogFlow chatbots ?
# Google & DialogFlow authentication system using Service Accounts
For a service to be allowed to communicate with a DialogFlow chatbot, this service needs to use validated credentials. To do so, Google proposes a system using “Service accounts”, that corresponds to validated identities to which we can add the needed permissions to communicate with the DialogFlow chatbot.
TIP
In order for Spoon software to be able to communicate with your DialogFlow chatbot, you will need a Service Account.
# Generate a service account for your chatbot
# Retrieve the project ID of your DialogFlow agent
- Go to the parameters of your agent in DialogFlow (opens new window)
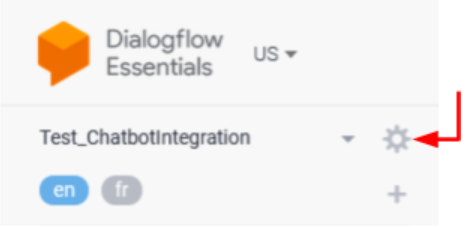
- Click on the ProjectID field and it will redirect you to the corresponding project on the Google Cloud Platform
# Create a Service Account with proper role & permissions + Key
Once on Google Cloud Platform (see previous section):
- Go to Menu > IAM & Admin > Service Accounts
- Create ServiceAccount
- Click on + Create Service Account
- Give a name to your service account, for example SpoonClient
- Click on Create
- In Select Role, choose role DialogFlow API Client
- Click on Continue
- Do nothing in Grant users access to this service account
- Click on Done
- Create a key for your newly created Service Account
- You should see your Service Account in the displayed list
- Click on the ... button in the Actions column + choose Manage Key > Add key > Create new key
- Choose JSON in the popup + Click on Create
- Download the json file on your computer and place it in the
${SPOON_INSTALL_PATH}/release/Conffolder.
TIP
Thanks to this JSON key file, Spoon software will be able to authenticate itself as the Service account, with the right permissions to communicate with your DialogFlow agent.
WARNING
- Do not commit your json file in a git repository ! Everybody will be able to use your identity. Your billing will increase a lot. (if you want to git your configuration, use a .gitignore to remove your json file)
- Only add the DialogFlow API Client role in IAM. In case of unwanted share of identity, the hacker is limited by this role.
# Link DialogFlow chatbots in the interaction flow
You can connect your chatbots at different steps of the interaction flow. See documentations about the Interaction Flow concepts and the technical details on how to customize your interaction flow using chatbots.
The connection of your chatbot relies on the definition of a ChatbotConfiguration. For DialogFlow chatbots:
"chatbotConfiguration":
{
 "engineName": "DialogFlow",
 "connectionConfiguration":
 {
   "serviceAccountFileName": <string>,
   "platformName": <string>,
   "environmentName": <string>
 }
}
- engineName: set it to “DialogFlow” as your are using DialogFlow chatbot engine
- connectionConfiguration: will include the informations to properly connect Spoon software with your DialogFlow Chatbot
- serviceAccountFileName: full name (including the extension) of your service account JSON file "projectID-XXX.json" (make sure this file has actually been copy/pasted next to the release.conf in the Spoon release configuration folder:
C:/Program Files/SPooN/developers-1.2.1/release/Conf) - platformName: (for expert usage) allow you to choose which DialogFlow platform messages from your agent to use in this connection with Spoon software
- DialogFlow proposes multiple integration platforms (Default, Slack, Telegram, …) with different message types, Spoon can be connected to all of them
- For non-experts usage, we recommend to use the Default platform, for this, you just need to set an empty platformName : “platformName”: “” or not set the platformName variable
- environmentName: makes it possible to select a specific environment for your chatbot if you are using versions and environments (see documentation (opens new window))
- you just need to specify the name of the environment in this field.
- Examples:
- “environmentName”: “Production”
- if you haven't published a version, you can use "environmentName": "Draft"
- serviceAccountFileName: full name (including the extension) of your service account JSON file "projectID-XXX.json" (make sure this file has actually been copy/pasted next to the release.conf in the Spoon release configuration folder:
# How to bind the main entry of a Service with your DialogFlow chatbot
As explained in the technical documentation about ServiceConfiguration, it is possible to connect a chatbot to declare a service. If the field canBeProposed of your service is set to true, it will create a main entry point, that will be accessible in the Launcher
- by clicking on its icon
- by saying its trigger example
TIP
This will send the event "Spoon_GenericStart" to your chatbot. You can also customize it in the chatbotConfiguration to use your own event name.
For your chatbot to react to this event, you just need to add this event "Spoon_GenericStart" (or the event trigger you used in your customization) to one of the intent of your agent

# How to send custom messages to SPooN
Once you've matched your intent with Dialogflow, the responses that you add to that detected intent will be sent to SPooN as actions to be executed. You have different ways of controlling SPooNy from the SDK.
SPooN will read the text of the response that you wrote in Dialogflow.
But if you want to make better use of SPooN's capabilities (make SPooNy smile, show images, multi-choice question,...), you should use SPooN's custom payloads. Simply click the Add Responses button in Dialogflow's intent and choose Custom Payload. You can add multiple payloads as actions to the same intent (by adding multiple CustomPayload type responses).
If you have multiple responses in the same intent, then SPooNy will execute the corresponding actions one after the other.
The payloads are described in SPooN specific message.
# DialogFlow specific tips & tricks
# Open Question DialogFlow
If you're capturing some freespeech user input (such as a name for example), use the OpenQuestion payload as described here in your intent.
Let's use the following example:
{ "spoon":
  {
    "id": "OpenQuestion",
    "questionId": "Name",
    "question": "What is your name?"
  }
}
For this mechanism to work, do the following:
- Create a fallback intent (click on the "..." icon next to the
Create Intentbutton and chooseCreate Fallback Intent) - Name this intent as you wish (it has no impact on the mechanism)
- Add an input context to match your open question. The name of the input context is normalized:
OpenQuestion_+ thequestionIdthat you chose in the payload (soOpenQuestion_Namein our example). - Make sure this context is removed when the intent is triggered by setting its lifespan to 0 in the output context field.

Your fallback intent will be triggered when the user answers the open question and you will be able to retrieve the content of their answer in the text of the query, using fulfillments (opens new window) with DialogFlow Inline Editor (opens new window) or your own Webhook service (opens new window).
Check the example to see how this can be achieved.
# Dialogflow example
Let's build the following example together on Dialogflow.
Download the zipped chatbot here (opens new window).
Create a new chatbot in Dialogflow - make sure you use the correct default language, French in this example - and import the downloaded zipped example. As shown on the screenshot below, click on the wheel at the top left, then Export and Import and choose the Restore from zip option.

After the import, go back to the intent page. You now have access to the following intents. Feel free to look at each intent to see the different ways to interact with SPooNy: speaking, displaying pictures, asking questions, ...

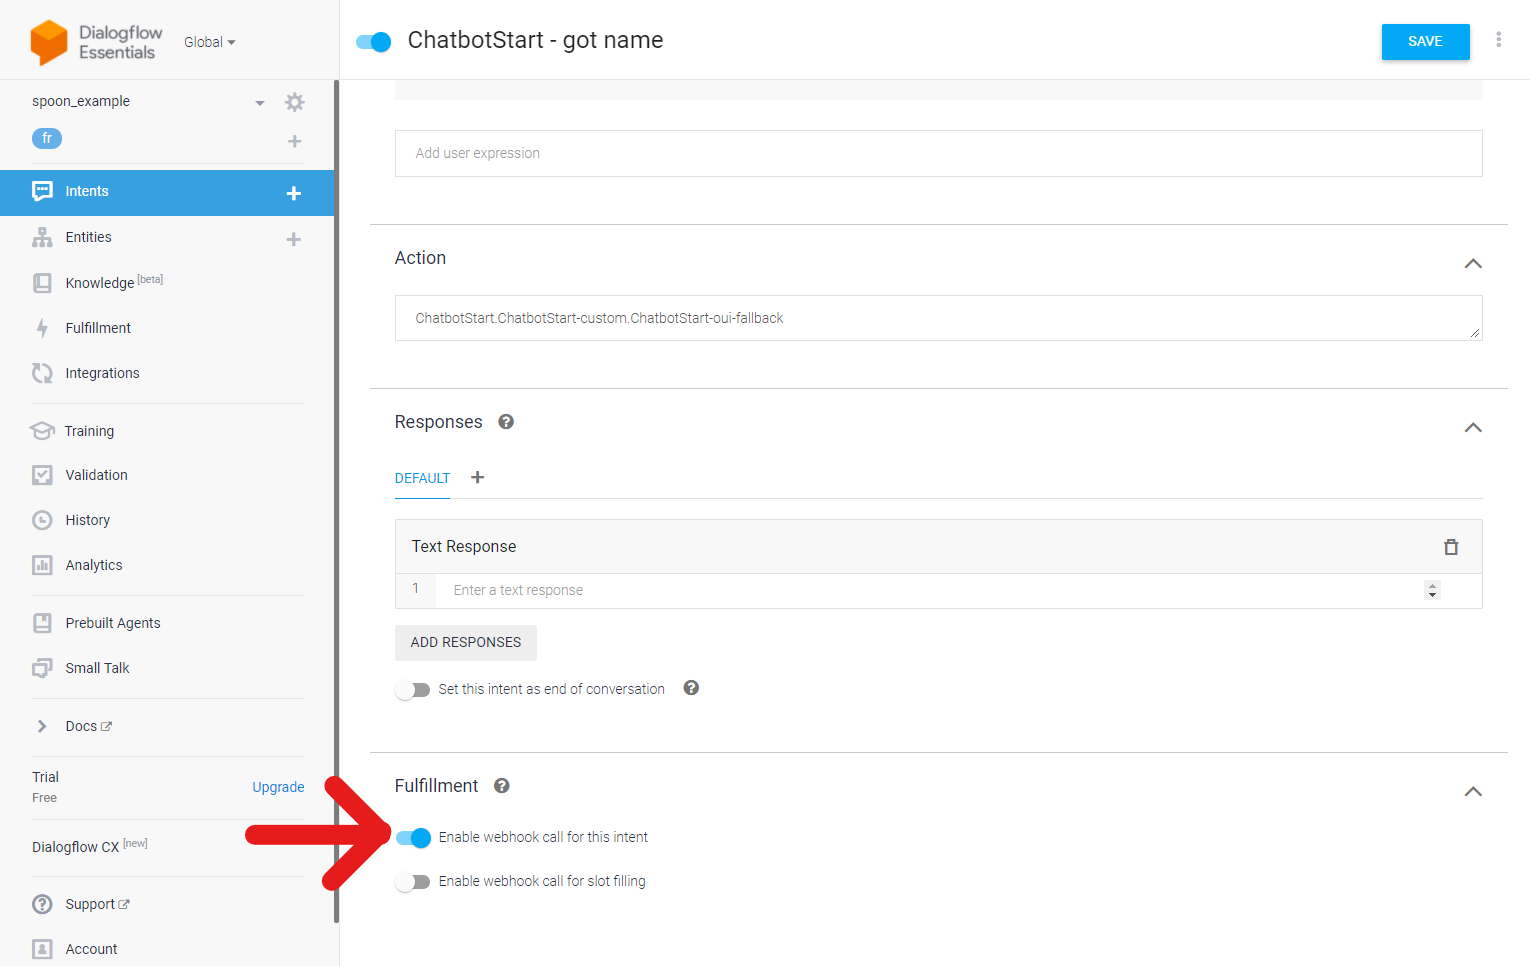
Let's create a Fulfillment to read the user name from the open question answer. This happens in the ChatbotStart - got name fallback intent (as explained in the Open Question Dialogflow section). Notice that the Enable webhook call for this intent is checked.
Go to the Fulfillment. For this example, we use the convenient inline editor.
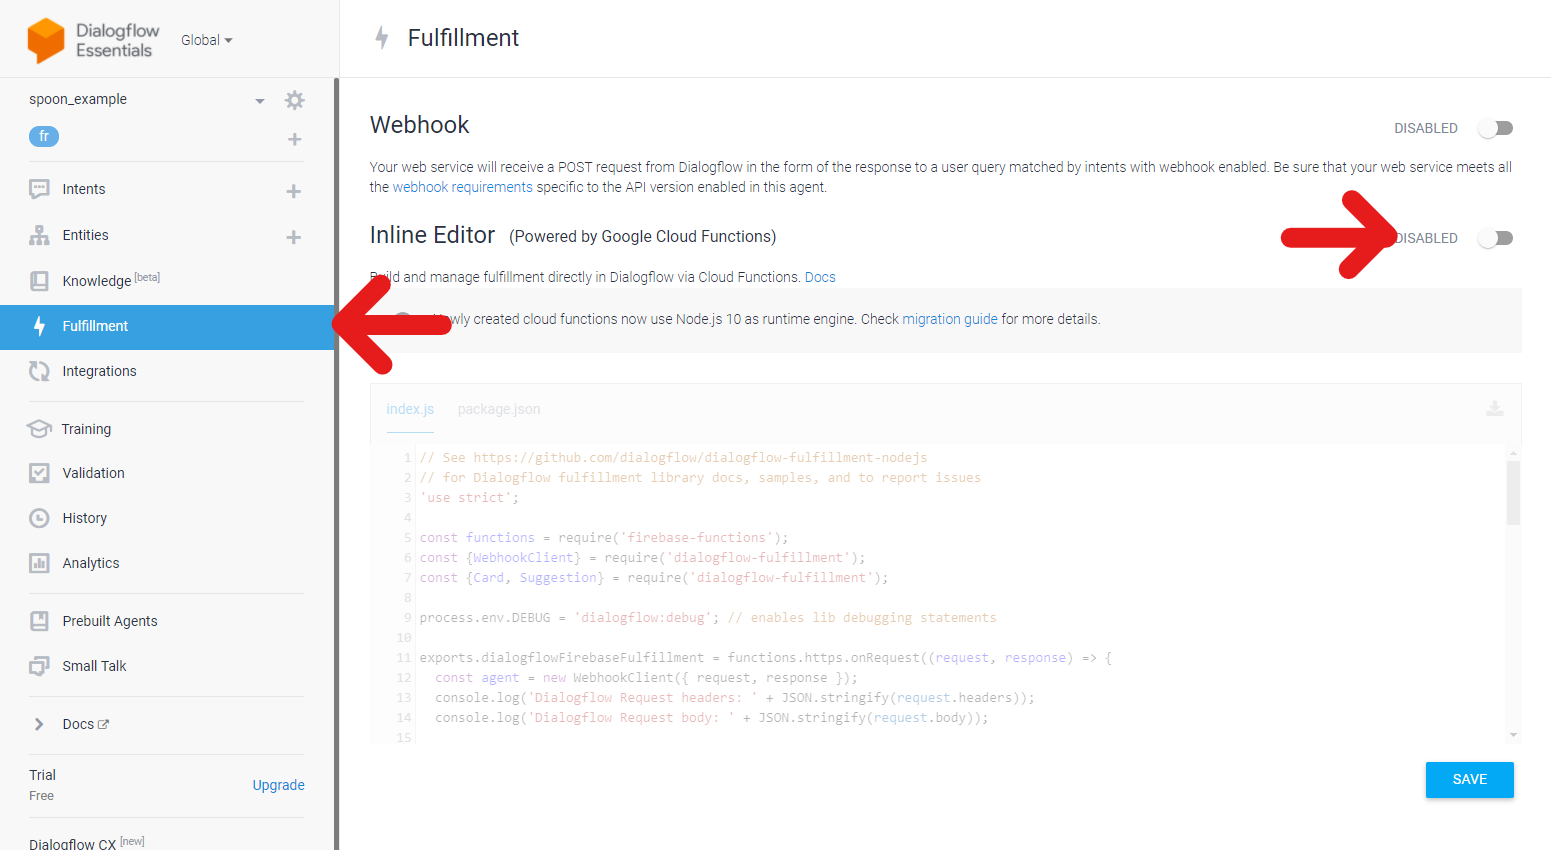
Once enabled, replace the index.js in the inline editor with the code below. Read the comments to understand what it does. There is a bug in the older version of the dialogflow-fulfillment package for sending payloads. Make sure you also replace the package version in the package.json file in the inline editor by this: "dialogflow-fulfillment": "^0.6.1" .
'use strict';

//imports
const functions = require('firebase-functions');
const {WebhookClient, Payload} = require('dialogflow-fulfillment');
const {Card, Suggestion} = require('dialogflow-fulfillment');

process.env.DEBUG = 'dialogflow:debug'; // enables lib debugging statements

exports.dialogflowFirebaseFulfillment = functions.https.onRequest((request, response) => {
  const agent = new WebhookClient({ request, response });

  function openquestionresponse (agent) {
    // we read the input as it contains the username (typed in on the keyboard from our openquestion)
    let username = agent.request_.body.queryResult.queryText;
    // This text will be read by SPooNy
    agent.add(`C'était vraiment chouette de faire ta rencontre ${username} ! J'ai fini ma démo. Passe une belle journée!`);

    const payload = {
        spoon: {
          id: "EndScenario",
    	    status: "Succeeded",
    	    afterEndType: "Active",
    	    message: "demo ended"
        }
    };

    //We can also send our custom SPooN payloads
    agent.add(new Payload(agent.UNSPECIFIED, payload, {rawPayload: true, sendAsMessage: true}));

    console.log('Added the payload response: ' +  JSON.stringify(payload));
  }

  // Run the proper function handler based on the matched Dialogflow intent name
  let intentMap = new Map();
  //this is where we map our fonction openquestionresponse to our intent: "ChatbotStart - got name"
  intentMap.set('ChatbotStart - got name', openquestionresponse);
  agent.handleRequest(intentMap);
});
You are now ready to connect your chatbot to your robot. In this case, the fastest way to get it to work is to use SPooN's WithLauncher flow. Here is an example of the services section of the release**.conf file I use for linking my chatbot. Replace the serviceAccountFileName by your own file name that you created - check the Generate a service account for your chatbot section to do so if you haven't already.
    "services": [
      {
        "name": "ServiceTest",
        "canBeProposed": true,
        "iconName": "learning",
        "timeout": 10.0,
        "trigger": {
          "en_US": "Start the test",
          "fr_FR": "Lance le test"
        },
        "explanation": {
          "en_US": "Start the test chatbot",
          "fr_FR": "Lance le chatbot de test"
        },
        "chatbotConfiguration":
        {
          "engineName": "DialogFlow",
          "connectionConfiguration":
          {
            "serviceAccountFileName": "YOUR_KEY.json",
            "platformName": "",
            "environmentName": "Draft"
          }
        }
      }
    ]
  },
You can now test the example by start SPooN's software and saying "lance le test" or sentences that are semantically close to it.
# Inbenta
Inbenta (opens new window)'s platform is connected to SPooN's SDK. Please follow their documentation to learn how to create a chatbot.
# Connecting Inbenta to a SPooN release
# Retrieving your Inbenta credentials
The information you need to connect to Inbenta are on the administration page of your Inbenta platform. Click on the administration icon in the top bar, then on the API in the left bar menu. Choose whether you want to connect to your development or production environment.
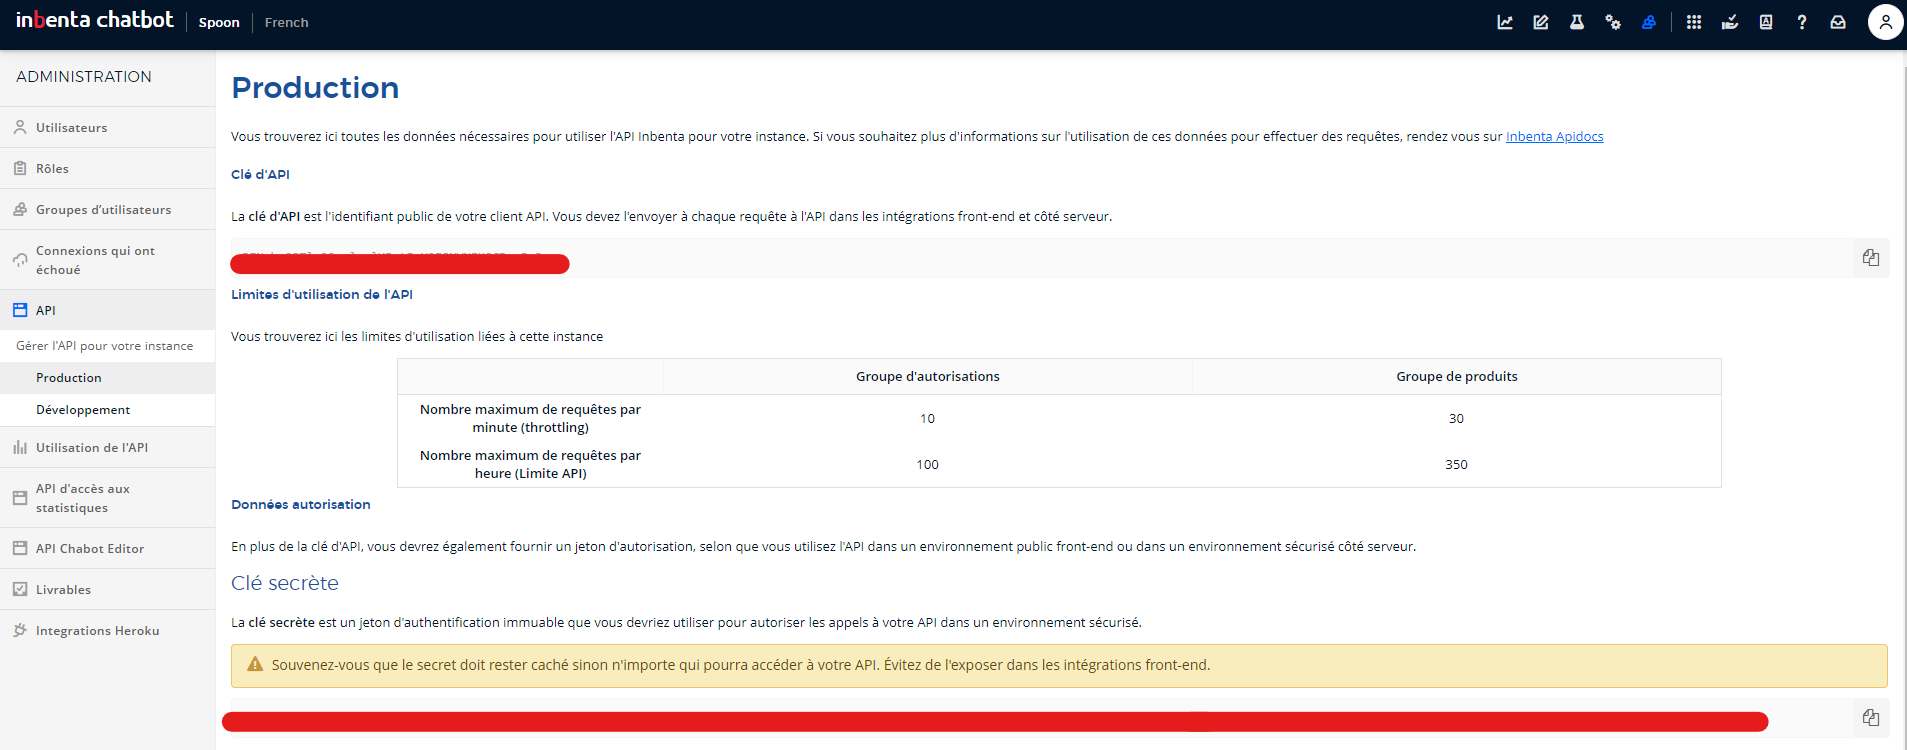
You need the following information to connect your Inbenta chatbot to SPooN's SDK:
- inbenta api key: keep that API key handy as you'll use it in the
release.conffile as described in the instructions below - inbenta secret key: simply save that secret key in a file (for example
inbenta.key). Save this file next to therelease.confwhich you can usually find atC:/Program Files/SPooN/developers-1.2.1/release/Conf.
# Link Inbenta chatbots in the interaction flow
You can connect your chatbots at different steps of the interaction flow. See documentations about the Interaction Flow concepts and the technical details on how to customize your interaction flow using chatbots.
The connection of your chatbot relies on the definition of a ChatbotConfiguration. For Inbenta chatbots:
"chatbotConfigurations":
{
   "engineName": "Inbenta",
   "connectionConfiguration":
   {
     "inbentaApiKey": <string>,
     "inbentaPrivateKeyFileName": <string>
   }
}
- engineName: set it to "Inbenta" as your are using Inbenta chatbot engine
- connectionConfiguration: will include the informations to properly connect Spoon software with your Inbenta Chatbot
- inbentaApiKey: The API key that you find in the Inbenta API settings as described above.
- inbentaPrivateKeyFileName: full name of the file that contains your Inbenta private key (make sure this file has actually been copy/pasted next to the release.conf in the Spoon release configuration folder:
C:/Program Files/SPooN/developers-1.2.1/release/Confas explained above). If you used the instructions above, the filename isinbenta.key.
# How to bind the main entry of a Service with your Inbenta chatbot
As explained in the technical documentation about ServiceConfiguration, it is possible to connect a chatbot to declare a service. If the field canBeProposed of your service is set to true, it will create a main entry point, that will be accessible in the Launcher
- by clicking on its icon
- by saying its trigger example
TIP
This will send the event "Spoon_GenericStart" to your chatbot. You can also customize it in the chatbotConfiguration to use your own event name.
For your chatbot to react to this event, you just need to add this event "Spoon_GenericStart" (or the event trigger you used in your customization)to the "DIRECT_CALL" field to one of the intent of your agent
# How to send custom messages to SPooN
SPooN will read the text of the answer that you wrote in Inbenta. SPooNy will show the images as well.
But if you want to make better use of SPooN's capabilities (make SPooNy smile, multi-choice question,...), you should use SPooN's custom payloads. In the rich text editor, choose the format Formatted from the editor. You can add multiple payloads to the same message by having multiple separate Formatted paragraphs.
WARNING
To make sure the payloads are in distinct paragraphs, you can switch to the Source view. Simply make sure that each payload is between <pre></pre> tags.
If you have multiple paragraphs (with texts, images or payloads) in the answer you wrote, then SPooNy will execute the corresponding actions one after the other.
The payloads are described in SPooN specific message.
# Inbenta specific tips & tricks
# Open Question Inbenta
If you're capturing some freespeech user input (such as a name for example), use the OpenQuestion payload as described here in your intent.
Let's use the following example:
{ "spoon":
  {
    "id": "OpenQuestion",
    "questionId": "Name",
    "question": "What is your name?"
  }
}
For this mechanism to work, do the following:
- Create a variable from the Inbenta Variables interface. The name of the variable is normalized:
OpenQuestion_+ thequestionIdthat you chose in the payload (soOpenQuestion_Namein our example). In validation, select the Data type only option as it's freespeech. - Create a new dialog tree that starts at receiving the user's answer. Your first intent (the one connected to
Startin the Inbenta Dialog tree) uses theDIRECT_CALLtriggerOpenQuestion_+ thequestionIdthat you chose in the payload (soOpenQuestion_Namein our example).
Your intent will be triggered when the user answers the open question and you will be able to retrieve the content of their answer in the variable OpenQuestion_ + questionId that you created, using Inbenta syntax for variables (so in our example).
# SPooN specific messages
# Say (basic, without expression)
Action description: Spoony says something
Message description:
- Message type: Text Response
- Content : “textToSay”
# Expressive Say (Say with expression)
Action description: Spoony says something while expressing a chosen expression
WARNING
For the moment, the expressions are not connected yet and will not be called when executing the action. However you can already use this action with an expression, so that your chatbot will be ready for when the expressions will be connected.
Message description:
{
  "spoon" :
  {
    "id": "Say",
    "text": <string>,
    "expression":
    {
      "type": <TypeEnum>,
      "intensity": <float>,
      "gazeMode": <GazeModeEnum>
    }
  }
}
- id: ID of the Action ⇒ “Say”
- text: text to say
- expression: expression to be expressed by Spoony while saying the text
- type: type of the expression
- enum among the following list : [“Neutral”, “Happy”, “Sad”, “Surprised”, “Scared”, “Curious”, “Proud”, “Mocker”, “Crazy”]
- intensity: intensity of the expression
- float between 0 and 1 (1 corresponding to the maximum intensity of the expression)
- gazeMode: corresponds to the expected behavior of the gaze (eyes) of Spoony during the expressing
- enum among the following list
- “Focused” : Spoony will keep looking at the user during the whole expression
- “Disctracted” : Spoony might not look at the user during the whole expression and look away (but it will look back at the user at the end of the expression)
- enum among the following list
- type: type of the expression
# Expressive Reaction
Action description: Spoony will express a short expressive reaction
WARNING
For the moment, the expressive reaction only contains a short sound
Message description:
{
  "spoon" :
  {
    "id": "ExpressiveReaction",
    "expression":
    {
	"type": <TypeEnum>,
      "intensity": <float>,
      "gazeMode": <GazeModeEnum>
    }
  }
}
- id: ID of the Action ⇒ “ExpressiveReaction”
- expression: expression to be expressed by Spoony while saying the text
- type: type of the expression
- enum among the following list : [“Neutral”, “Happy”, “Sad”, “Surprised”, “Scared”, “Curious”, “Proud”, “Mocker”, “Crazy”]
- intensity: intensity of the expression
- float between 0 and 1 (1 corresponding to the maximum intensity of the expression)
- gazeMode: corresponds to the expected behavior of the gaze (eyes) of Spoony during the expressing
- enum among the following list
- “Focused” : Spoony will keep looking at the user during the whole expression
- “Disctracted” : Spoony might not look at the user during the whole expression and look away (but it will look back at the user at the end of the expression)
- enum among the following list
- type: type of the expression
# Multiple Choice Questions
Action description: Spoony asks a question and suggests a list of expected responses (displayed on the screen as interactive buttons)
Message description:
{
  "spoon" :
  {
    "id": "MCQ",
    "question": <string>,
    "visualAnswers": <bool>,
    "visualTemplate":
    {
       "type": <VisualTemplateTypeEnum>,
       "buttonLayout":
       {
         "type": <ButtonLayoutTypeEnum>
       }
    },
    "answers": [
    {
      "displayText": <string>,
      "content": <string>,
      "imageUrl": <string>
    },
    {...}
    ]
  }
}
- id: ID of the Action ⇒ “MCQ”
- question: question that will be asked by Spoony
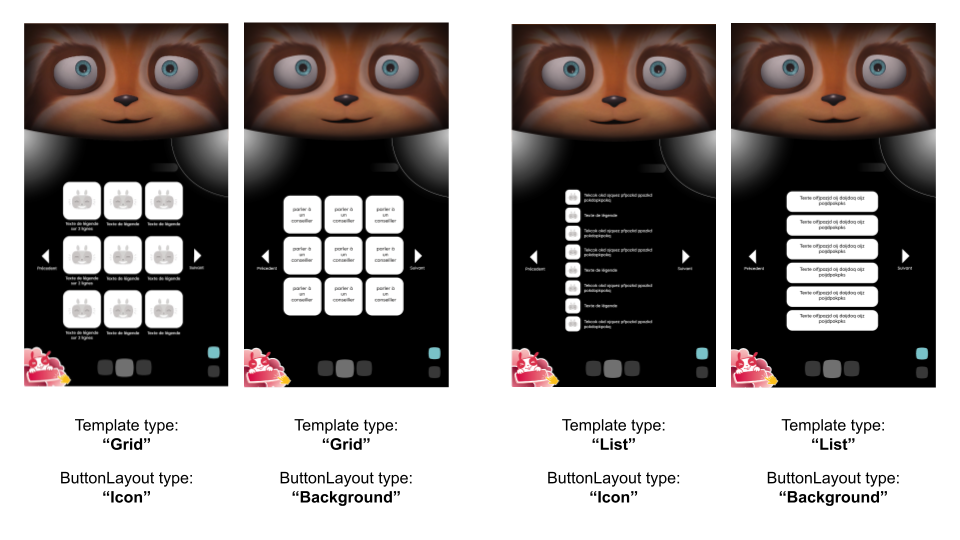
- visualAnswers: set to true if you want to display the MCQ as a menu with images, false to display only the triggers
- visualTemplate: choose a template for the UI with the different elements, displayed as buttons with image and text.
- type: type of the template
- Possible values:
- "Grid": the elements are displayed as squares buttons in a grid, with multiple rows and multiple elements per row.
- "List": the elements are displayed as rectangular buttons in a vertical list, with only one element per line.
- Default value (when field not set): "Grid"
- Possible values:
- "buttonLayout": define the layout of the buttons
- "type": type of the button layout
- Possible values:
- "Icon": the text of the button is displayed next to the image
- "Background": the text of the button is displayed on top of the image, used as a background.
- Default value (when field not set):
- "Icon" for "Grid" template type
- "Background" for "List" template type
- Possible values:
- "type": type of the button layout
- answers: list of expected answers
- for each answer
- displayText: text displayed in the corresponding interactive button, that can trigger the answer
- content: simulated input to the chatbot when answer is selected (by voice or by button validation)
- imageUrl: url of the image to be displayed with the answer
- for each answer
To guarantee the best quality of the your visual template display, follow these recommendations for image resolutions, based on the chosen template configuration:
- For "Grid" templates, use square images with a resolution of 200px x 200px.
- For "List" templates
- with a "Icon" button layout, use square images with a resolution of 100px x 100px.
- with a "Background" button layout, use rectangular images with a resolution of 480px x 180px.
# Open Question
Action description: Spoony asks a question and waits for a freespeech input. The user validates the input by clicking on the text displayed by SPooNy.
Message description:
{ "spoon" :
  {
    "id": "OpenQuestion",
    "questionId": <string>,
    "question": <string>,
    "keyboardType": <string>
  }
}
- id: ID of the Action ⇒ "OpenQuestion"
- questionId: ID of the question, to use in order to link a reaction to the answer and retrieve its content.
- question: question that will be asked by Spoony
- keyboardType: type of the keyboard to be displayed to help the user to answer
- by default this value is set to null and no keyboard is displayed
- possible values:
- null: no keyboard is displayed
- "Text": to enter texts
- "EmailAddress": to enter email adresses (see here how to set custom email suffixes in the keyboard)
- "Number": to enter numbers
# Display Image
Action description: Spoony will display an image on the screen (it can also display a Gif, based on the extension of the image url)
Message description:
{
  "spoon" :
  {
    "id": "DisplayImage",
    "imagePath": <string>,
    "caption": <string>,
    "duration": <float>
  }
}
- id: ID of the Action ⇒ “DisplayImage”
- imagePath: url of the image
- compatible extensions : png, jpg, gif
- caption: (optional) caption of the image
- duration: (optional) how long to display the image for in seconds
- if the duration is less or equal to zero, then the image is displayed until the next user's input (the default value is 0), or until HideImage is called.
# Hide Image
Action description: Spoony will hide the displayed image.
Message description:
{
  "spoon" :
  {
    "id": "HideImage"
  }
}
- id: ID of the Action ⇒ HideImage.
# Display Video
Action description: Spoony will display a video on the screen. The video will close on its own at its end, or can be cancelled by the user.
Message description:
{
  "spoon" :
  {
    "id": "DisplayVideo",
    "videoPath": <string>,
    "sourceFolder": <float>
  }
}
- id: ID of the Action ⇒ DisplayVideo
- videoPath: url of the video
- compatible with most video types (opens new window)
- sourceFolder: use "WEB".
At the end of the video you can get two different events. Simply use those events as triggers to your intents in your chatbot.
- Spoon_DisplayVideo_VideoViewerID_End if the user watched the whole video
- Spoon_DisplayVideo_VideoViewerID_Cancel if the user canceled the video while it was playing
WARNING
In this version the streaming websites such as youtube or vimeo ar not yet supported. The API takes a direct link to a video file.
# Change Language
Action description: Spoony will change its interaction language
Message description:
{
  "spoon" :
  {
    "id": "Language",
    "language": <LanguageEnum>
  }
}
- id: ID of the Action ⇒ “Language”
- language: target language
- enum among the following list [ “en_US”, “fr_FR”, “ja_JP”, “zh_CN”]
# Wait
Action description: Spoony will wait for the given amount of time.
Message description:
{
  "spoon":
  {
    "id": "Wait",
    "timeToWait": <float>
  }
}
- id: ID of the Action ⇒ “Wait”
- timeToWait: the time to wait for, in seconds
# EndScenario
In your chatbot, when you think the service has been delivered, it is important that you declare that your service has ended.
If you do not declare this end, the user will not be able to do anything else with Spoony until the timeout of the chatbot is reached.
Action description: Spoony will end the current scenario (see explanation here)
Message description:
{
  "spoon" :
  {
    "id": "EndScenario",
    "status": <StatusEnum>,
    "afterEndType": <EndTypeEnum>,
    "message": <string>
  }
}
- id: ID of the Action ⇒ “EndScenario”
- status: The status of the ending, i.e how the scenario ended
- Possible values:
- "Succeeded": the scenario finished correctly, the user got what they wanted
- "Failed": the scenario did not finished as expected, the user did not get what they wanted
- “CancelledByUser”: the scenario stopped because the user decided to stop it
- "Error": something went wrong
- Possible values:
- afterEndType: behavior after scenario end
- When a scenario has ended, the character can have different behaviours based on the value of this field
- Possible values:
- "Passive": the character does not do anything proactively after the scenario end
- Active: the character asks the user if we wants to do something else (and starts the launcher if the user says “yes”)
- message: scenario end message
- Stores additional information about the scenario end (can be used to have more precise statistics in SpoonAnalytics for example)